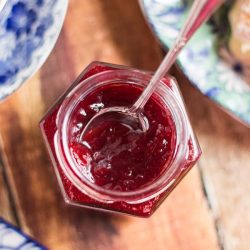
Low Sugar Strawberry Vanilla Jam {Small Batch}
This basic recipe will make any type of jam. Play with the flavourings and the sugar levels to find something you love. Some jam makers use as little as 20% sugar:fruit ratio.
Make sure that your jars are well sterilised prior to bottling the jam to maximise the storage time. Heat process the jam if you wish, but personally I never do and have never had a problem.
I use a traditional French jam pan for making my jam, but jam can be made in any pan you may have. It is better for the pan to be wider with lower sides than a deep pot as this will help the water to evaporate, but if a pot is all you have do not let this put you off. The jam may just take longer to cook. .
It is important that the jars used to bottle the jam are warm. I get around this by sterilising my jars in the oven (see Notes).
This jam must be kept in the fridge once opened.
Calories:
Ingredients
- 1 kg strawberries hulled and halved (or quartered if large)
- 400 g raw sugar
- 1 pieces small lemon cut into 4 and pips removed.
- 1 vanilla pod split
Instructions
- Place a small plate into the freezer. This will be used to test the jam for set and must be cold.
- Place all of the ingredients in the pan over a low heat.
- Allow the sugar to dissolve, stirring occasionally. The juices will start to weep from the fruit.
- Once the sugar has dissolved, increase the heat to medium-low and allow the jam to gently bubble for about 15-20 minutes, stirring frequently. The fruit will start to soften and visibly appear darker.
- Increase the heat to high and allow to boil until the jam has darkened and thickened. Stir the jam frequently and don't walk away during this stage as the jam can catch and burn on the bottom of the pan.
- Once the jam has thickened, remove the pan from the heat and test it for set. To do this, place a small spoonful of jam on the cold saucer and run your finger through the jam to test the consistency. If the jam is set there will be a clear line through the centre of the jam, and there will be no liquid seeping back into the line. (see photo).
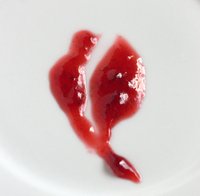
- If the jam is still slightly watery, and liquid seeps into the line you created with your finger, return the jam to the heat and cook for a few more minutes. Repeat the saucer test.
- When the jam is set, place the warmed jars on a cutting board or tray. This will prevent the jars cracking as you pour the hot jam into the jars.
- Fill the warmed jars with the jam. With a clean cloth, wipe the top of the jars to remove any spills or stray globs of jam, then seal the jars well with a lid.
- Allow the jars to sit undisturbed for at least 12 hours or overnight to allow the jars to seal properly and form a vacuum. If you suspect that a vacuum has not formed in any of your jars, store these in the fridge and use them immediately.
Notes
I sterilise my jars in a low oven at 120C. Place the jars in a cold oven and turn the oven on. Allow the jars to warm for at least 30 minutes then turn the oven off. Longer will not hurt. Sometimes I place the lids in the oven with the jars but more often I put the lids in a saucepan of cold water and bring it to the boil. Allow the saucepan to boil for about 10 minutes then turn the pot off. To use the lids, shake off the water and seal the jars whilst the lids are still hot.