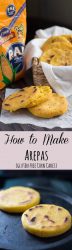
Looking for a good, gluten free substitute for bread? Learn how to make arepas at home, and with a few simple toppings you will never be far from a tasty meal.
Total Time Investment: 48 Minutes

We have had the luxury of a small hawker’s markets operating in a nearby local park over the summer months. Most Friday evenings we would stroll down and select dinner from the various cuisines on offer. After working my way through Indian, South East Asian and Turkish, I one day found myself in front of the Venezuelan van ordering the arepa stuffed with shredded beef and black beans. The juice from the beef soaked into the fluffy corn, and the whole combination was utterly delicious. Unfortunately arepas cannot just be bought off the shelf, so to recreate this meal I have had to learn how to make arepas at home.
Arepas make a great gluten free option, and a nice change from the traditional loaf. The crunchy outside and the fluffy inside pair well with a variety of fillings. With shredded beef and piles of arepas in the freezer, and jars of beans in the pantry, I now have the makings of a quick and delicious meal with minimal effort.
Did you know #arepas make a delicious #glutenfree alternative to #bread. Best consumed fresh, just follow my #easy #recipe to learn how to make arepas at home. #homemade #snacks #dinner #dairyfree #vegan Click To TweetI am not in any way claiming that this is an authentic Colombian or Venezuelan recipe for arepas. However, after many hours spent on internet research as to how to make arepas, I have developed a recipe that works well in my kitchen and has been well received by my family. I hope it becomes as well loved in your home.

* We are a participant in the Amazon Services LLC Associates Program, an affiliate advertising program designed to provide a means for us to earn fees by linking to Amazon.com and affiliated sites.
How to Make Arepas At Home: A Few Tips for Success
After playing with this recipe for a while, I can offer the following tips that will hopefully ensure great success if you wish to make these at home:
- Use your hands to combine the flour and water. This will enable you to feel any lumps in the mixture, and allow you to work them out in the dough.
- It is not necessary to use boiling water to make the arepa dough. Hot water from the tap is of a suitable temperature for this recipe.
- The dough should not stick to your hands, nor should it crack when you try to shape the arepas. You may need to add sightly more water or flour after the dough has rested to get the correct consistency.
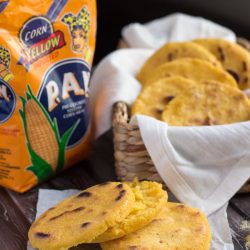
- I have used yellow cornmeal (masarepa) for these arepas, as that is what I had. White cornmeal (masarepa) will produce the same results.
Arepas can be grilled, fried, steamed or cooked in the oven, and are best served freshly cooked, split as soon as possible to preserve the fluffy centre. I have found that if allowed to cool, or if reheated, they become significantly denser.
Even though arepas need to be freshly cooked, and do not take that long to make, you can still prepare the dough in advance in order to whip them up whenever a craving hits. Freshly mixed arepa dough can be stored in the fridge for up to three days. I prefer to shape the arepas first, then store them on a flat tray until I wish to cook them.
I have also had success freezing the shaped arepas, then either cooking straight from frozen or allowing them to defrost overnight in the fridge. To freeze arepas, shape the dough then place on a lined baking tray and flash freeze. Once solid, store in zip lock bags for up to three months.

How to Make Arepas: Frequently Asked Questions
What are arepas? Arepas are a small corn flatbread; a staple in Venezuelan and Colombian cuisine. Usually served stuffed with filling, arepas can be eaten at any time of the day.
What is arepa flour made of? Arepa flour is a refined, pre-cooked corn flour known as masarepa, which is not to be confused with masa harina, the lime-treated ground corn used to make tortillas.
How do you cook an arepa? There are a number of different methods for cooking arepas. Some people shallow fry the dough in hot oil, others prefer to cook the arepa on a hot plate or skillet. And some people prefer to use an electric arepa maker. Personally I like the consistency of the arepa that develops with the combination of pan frying and baking in the oven, so this is the method I use.
What are the best fillings for arepas? Arepas are delicious filled with pretty much anything, but if you can’t decided on your own what to serve them with, here are 20 filling ideas for arepas for you to consider.
Enjoy!
Made this recipe? Tell me how it went in the comments below.
And if you loved it, please don’t forget to rate it.
How to Make Arepas
Ingredients
- 228 g (2 cups) Masarepa {pre-cooked corn flour}
- 500 g (2 cups) warm water from the tap
- 1 teaspoon sea salt
- 1 teaspoon olive oil
Instructions
- Place the masarepa and salt into a large bowl, and stir well.
- Drizzle the olive oil over the masarepa.
- Add the warm water to the bowl, and mix thoroughly to form a soft dough. I find it easier to do this with my hands
- Cover with a clean cloth and set aside to rest for 15 minutes.
- Divide the dough into 8 - 10 balls. The dough should not stick to your hands, nor should it crack when you try to shape it. If either of these happens, you may need to add sightly more water or flour to get the correct consistency.
- Take a dough ball and pat it out into a 10 cm wide round. The finished round should be about 1.5cm thick. I find it easiest to do this by placing the dough onto a small cutting board and patting it into shape.
- Repeat with the remaining balls.
- You can freeze the arepas at this point, or store in the fridge for up to 3 days.
To cook the arepas:
- Preheat the oven to 195C (175C fan forced)
- Preheat a heavy fry pan or grill plate over medium heat.
- Place the arepas on the preheated fry pan, and allow to sit or 3 - 4 minutes. The arepas are ready to turn when the base has turned a slightly darker colour, small brown patches are visible across the surface, and they lift easily from the surface of the fry pan.
- Flip the arepas and cook for a further 3-4 minutes.
- Place the browned arepas on a lined baking tray, and bake in the oven for 15 - 20 minutes, or until they sound hollow when tapped.
- Remove from the oven, and split with a small serrated knife, leaving a 'hinge' at the base of the arepa to contain the filling.
- Enjoy whilst hot.
Notes
Update notes: This post was last updated on 30th April 2018 to include nutritional information in the recipe, additional notes for making arepas, and additional supporting information.
How interesting! I’d not heard of arepas until reading this. They sound yummy.
I hadn’t come across them before Liz until I ordered one. They are very good and make a great change.
Cornmeal’s a staple in our house and I’ve been trying to find different ways to use it. Your post came at the right time! Never heard of it before now,
I’m glad Jenny 🙂 Cornmeal is not something I use much of, but I am trying to change that this year to move away from my dependence on wheat.
Thanks for this recipe! The first (and only) time I had an arepa was at a market too so I totally knew what you meant! 😀
Pleasure Lorraine 🙂 I love how markets are a great place to find new food experiences.
This Venezuelan corn flour PAN, has another type which is not yellow, and it is the best!!
The arepas are made there essentially with the white corn flour, instead of the yellow one that you are showing.
You can use both, with excellent results, the taste is really good.
I disagree with the preparation time, when you mix the flour with water (recommended warm water) in less than 10min is not sticky
Try this recipe, and taste arepas with cheese, ham, scramble eggs, use you imagination, they fit with everything
Thanks Nataly. The white variety is more difficult to find here, but I have seen it on occasion. I will keep an eye out for it, and try that next time. I like to rest the flour to make sure all of the water is absorbed properly, but I will try your suggestion next time I make them.
PAN can be found in most all latino/Mexican stores or markets. Just understand this is not the same thing as cornmeal or corn flour. You have to use Harina PAN to make Arepas. I only wait about 7 minutes to shape and fry the Arepas. You also do not have to bake them. Put a hole in center like a doughnut hole and fry on both sides. Just to cook the center. My favorite is scrambled eggs and cheese for breakfast or with roasted chicken, shredded lettuce and feta for lunch. You can also stuff them before you cook them with shredded ham and cheese, or mix grated cheese/velveeta in the dough for cheese arepas. Salt is not necessary for those on salt free diets.
Thanks for that Betty. Unfortunately we don’t have latino/Mexican stores or markets here in Australia. Wish we did! There is a more Asian focus on our food so we rely on on having to source Harina PAN from specialty stores 🙂 I like your tip of putting a hole in the centre. I will have to try that next time. Great tips for stuffings, too! Always great to get new ideas. Cheers 🙂
I forgot to add that you do not need oil in the dough either. All you need to make them is water and PAN and they will come out fabulous.
MMM mmm mmmmmm. So so so good!!! I made exactly as stated in recipe and they came out perfect. I did try some stuffed with grated cheese and that was really good as well. New recipe in our weekly rotation.
My wife is from Colombia and we make arepas on the daily. You need to try them in an air fryer. Make them up, form a pocket and stuff them with mozzarella, form into patties, oil, salt, 195 for 10 minutes, flip, then again for 8. AMAZING!
Thanks for that tip Cameron. I’m definitely trying this.